Running Your Own Password Manager
Introduction
By this point in time, I would hope that most, if not all people reading this blog post are aware of the benefits that password managers have to offer. You may even be using one, like Lastpass, Bitwarden. 1password, Dashlane, Keypass, the list could go on. My personal preference at this point in time is Bitwarden.
A few years ago, I started work at a company that shared all passwords via Lastpass so that they could easily be updated, shared, and revoked as needed. It was really a great system, one that I came to love for both the ease of use as well as the added security that it provides. All of a sudden, it was no more difficult to have a 100 character password as it was to have a 15 character password. This idea excited me and I jumped all in, changing every one of my passwords to a secure, randomly generated password that would not easily be cracked through password lists, brute force, or any other common method today. Things stayed like this for quite some time and I would even help friends, family, colleagues, and anyone else that would listen sign up for a password manager, knowing that it can help dramatically improve day to day security.
One question was more common than all of the others. How can I trust these password managers to not steal or lose my passwords? As a developer with an interest in security, I was able to answer with confidence that everything in their databases were encrypted and even the employees could not view my passwords. The employee would need to have my master password to unlock the vault. This answer helped ease the worries of those that I was helping, but another question had been in the back of my mind for quite some time. What happens to my passwords if Lastpass shuts down? This may not seem very likely, but with companies like Google shuttering services as fast as they are creating them, the worry was always in the back of my mind that I would need to scramble to move to a different password manager. This is when I went on the hunt for a password manager that I could host myself. That is when I discovered Bitwarden.
Hosting Bitwarden using the docs from their Github Repo turned out to be a rather heavy application, requiring me to run multiple Docker containers, including a sql server. This was heavy and just plain overkill for a single user setup. This is when I discovered bitwarden_rs, a Bitwarden-compliant server implementation written in Rust. that simply manages its own data through the use of SQLite.
Setup
Requirements
- A server, capable of running docker with docker-compose
- A domain name to point at your password manager
Step 1. Set up a DNS record for this site to be hosted at
The first step will be unique to your DNS provider, but the common task needed is a DNS "A" record created with the desired subdomain, with the IP address pointing at the server that will be running Bitwarden_rs. Note: In this example, using Cloudflare, notice the proxy status is set to DNS only. We will be getting our own SSL Certificate later on using Let's Encrypt, so we do not want to use Cloudflare's SSL encryption.

Step 2. Cloning and configuring Bitwarden_rs
On your server, clone this repository into a folder and open the .env file. There are only 3 pieces of information that need to be entered.
First, you will need to enter your VIRTUAL_HOST environment variable. This is the full domain setup in the previous step. In this example, this value would be an-example-subdomain.mchone.dev.
The same value can be entered as your LETSENCRYPT_HOST, the only difference being that this is the variable used by Let's Encrypt to determine what website you are creating an SSL Certificate.
Finally, we need to enter our DEFAULT_EMAIL, which, again is used by Let's Encrypt. This email is used to notify you if your certificate is going to expire and has not been renewed yet. This is optional, but it very important!
Step 3. Start it all up
Now that we've configured our DNS and our bitwarden_rs instance, it's time to start up the three required containers by simply running docker-compose up -d. This starts up our necessary containers for HTTPS setup through Let's Encrypt, an nginx container to terminate the SSL connection and starts up our instance of bitwarden_rs, storing the encrypted password database inside of ./bw_data.
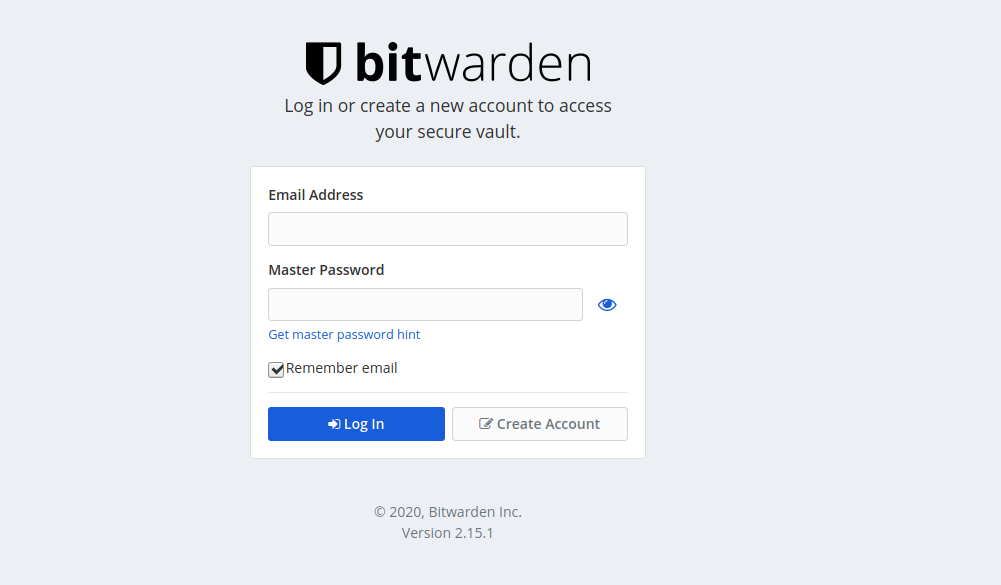
Step 4. Verification and Setup
Everything should be up and running without issue at this point, and we can verify this by navigating to our new subdomain inside of our web browser. If everything worked as expected, you should be greated with a bitwarden login screen, allowing you to register your account and begin saving your passwords! Once setting up an account, you can setup the official Bitwarden browser extension and mobile apps up by setting your Server URL for a self-hosted environment to the same subdomain that we set up in step 1.
Like this blog post? Share it on X!
Have feedback on this post?
Let me know what you think! I'd love to hear your thoughts, questions, or suggestions.
